Playing 5 against 4 is not necessarily as hard as it looks. Here’s an easy way to approach it:
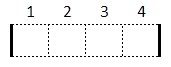
For starters just use your hands to hit the beat. The basic pulse is 16th notes and we will definethat four 16th notes make up one bar, which will look like this:
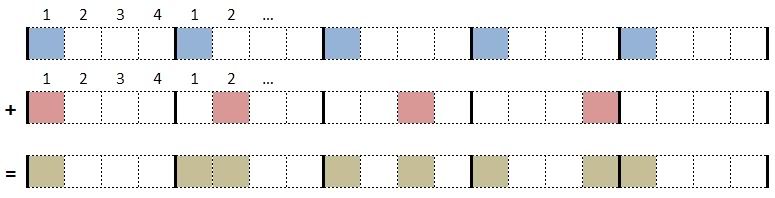
Now one hand (the blue hand, whichever that is for you) will hit every four 16th notes.

The other hand (the red hand) will hit every five 16th notes.

meet again (hit together) after a certain amount of repetitions. This will be after the blue hand
has hit five times (making it 5*4/16th = 20/16th ). The red hand will have hit four times by the
time they meet again (4*5/16th = 20/16th ).
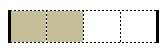
Now to make it easier to practice first let’s sum up both hands:
You get the brown line (you can approach it with any hand you like, or both…). Now look at
each bar in the brown line. These are the rhythmic segments you will have to learn in order to
play the whole thing in the end. It’s just four different segments:


Once you can play/hit each of these, put them together and play the whole brown line until it
feels comfortably. At this point you will have a basic feeling of the groove. All you need to do
now is to split the hits again and play the blue line with your blue hand and the red line with
your red hand!
Ok, now let's apply this to the guitar!
You can find a video of all the following parts at the end of this lesson.
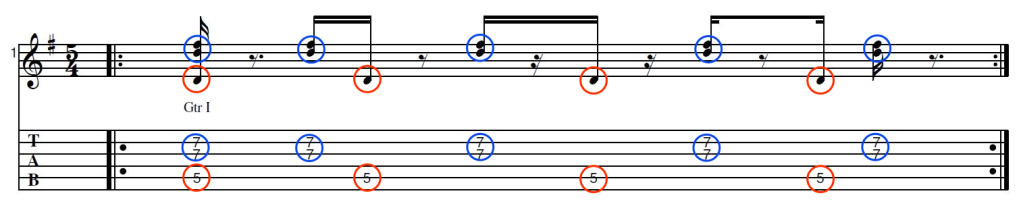
The first example plays just a D major chord. The notes on the B and G string will now be the "blue hand", i.e. will use the "blue" rhythm and the notes played on the A string will use the "red" rhythm.
Example 1:
As the 5 against 4 rhythm is 5 quarter notes long we'll add a 3 against 4 rhythm, which is 3 quarter notes long. Together they will be 8 quarter notes, an even number. I won't show you how to count the 3 against 4, you should be able to work that out yourself.
Let's apply this new rhythm to the guitar and add a walking bass line.
Example 2:

Now let's add some moevement to the high voice. Let's change it on every beat.
Example 3:

For a last variation let's add some notes between the waling bass line:
Example 4:

Here's my youtube lesson of the parts I showed here:
Hope you liked it, have fun, make music!
See you next time.
Cheers