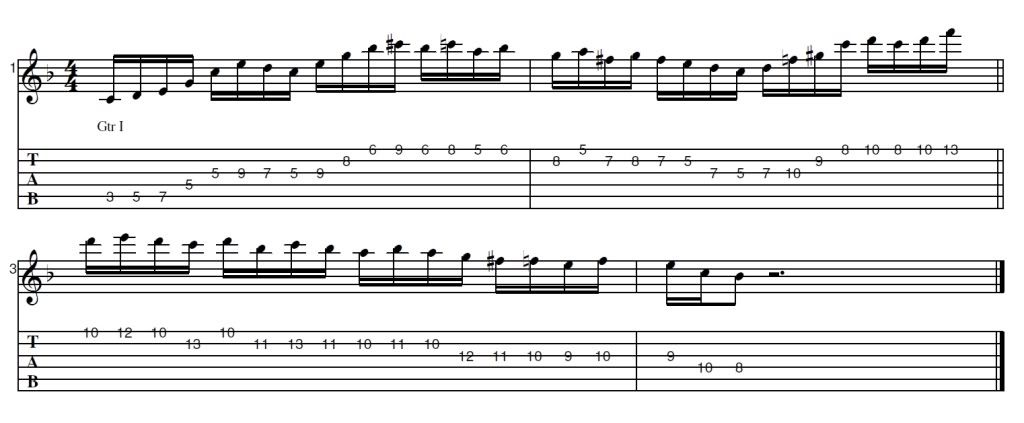
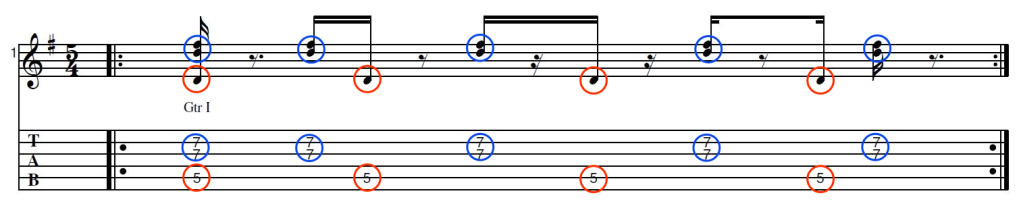
Simple idea. Use two adjacent arpeggios of the scale you want to be playing. (This is valid for all 7 note scales).
For example let's use the triads on the first and second scale degrees.
The first scale degree triad will give you the:
1st, 3rd and 5th
The second scale degree triad will give you the:
2nd, 4th and 6th
So, you see, if you play these two triads you are already playing all the scale tones except for the 7th.
Try it improvise with two adjacent triads!!
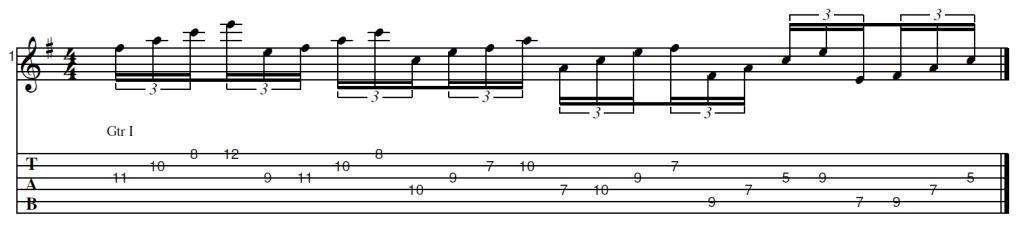
Now let's do the same with 7th arpeggios:
The first scale degree arpeggio will give you the:
1st, 3rd, 5th and 7th
The second scale degree arpeggio will give you the:
2nd, 4th, 6th and 8th
So this time you are using all the scale tones.
Again try improvising using two adjacent 7th arpeggios.
Here's a video showing and explaining the concept:
Hi today I'll talk about creating long, fusiony lines. This lesson is more about the way to come up with those lines than the line iteself.
Below you'll video where I show an example over a C7 chord.
I use notes from:
F major (C mixolydian)
F mel. minor (C mixolydian b6)
G mel. minor (C lydian b7)
and an E diminished arpeggio.
I finally managed to record a video of my song "Tsingtao Blues" from my instrumental CD "Space Fish".
I'm a little proud of this song as I think the technique I came up with to play the chorus is quite cool :-)
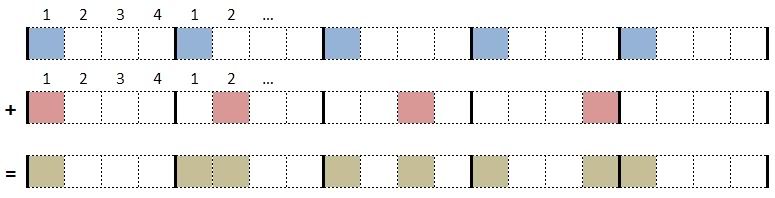
Playing 5 against 4 is not necessarily as hard as it looks. Here’s an easy way to approach it:
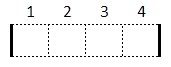
For starters just use your hands to hit the beat. The basic pulse is 16th notes and we will define
that four 16th notes make up one bar, which will look like this:
Now one hand (the blue hand, whichever that is for you) will hit every four 16th notes.
The other hand (the red hand) will hit every five 16th notes.
As you can see from the graphics both hands start together at the same time and they will
meet again (hit together) after a certain amount of repetitions. This will be after the blue hand
has hit five times (making it 5*4/16th = 20/16th ). The red hand will have hit four times by the
time they meet again (4*5/16th = 20/16th ).
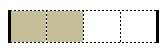
Now to make it easier to practice first let’s sum up both hands:
You get the brown line (you can approach it with any hand you like, or both…). Now look at
each bar in the brown line. These are the rhythmic segments you will have to learn in order to
play the whole thing in the end. It’s just four different segments:
Once you can play/hit each of these, put them together and play the whole brown line until it
feels comfortably. At this point you will have a basic feeling of the groove. All you need to do
now is to split the hits again and play the blue line with your blue hand and the red line with
your red hand!
Ok, now let's apply this to the guitar!
You can find a video of all the following parts at the end of this lesson.
The first example plays just a D major chord. The notes on the B and G string will now be the "blue hand", i.e. will use the "blue" rhythm and the notes played on the A string will use the "red" rhythm. Example 1:
As the 5 against 4 rhythm is 5 quarter notes long we'll add a 3 against 4 rhythm, which is 3 quarter notes long. Together they will be 8 quarter notes, an even number. I won't show you how to count the 3 against 4, you should be able to work that out yourself.
Let's apply this new rhythm to the guitar and add a walking bass line. Example 2:
Now let's add some moevement to the high voice. Let's change it on every beat. Example 3:
For a last variation let's add some notes between the waling bass line: Example 4:
Here's my youtube lesson of the parts I showed here:
Hope you liked it, have fun, make music!
See you next time.
Cheers
this time I'll show you some ways to change a lick you have learned in order to come up with many variations. The key is to understand what you have learned technique wise by learning a lick and find ways to expand your lick while staying close to the original technique.
Besides trying to play those paradiddles the way he shows, which is way cool, I also came up with my own ideas. I play them using just fingers and also apply them to chords.
An idea to play chords which would be otherwise impossible (at least for me) to play.
Use one finger of you picking hand to fret additional notes, while using the other fingers to pluck the string like you would normally! This enables you to play, for instance, two major second intervalls in one chord.
Watch for an example:
This way you can also play scale, while having the notes ring into each other (see end of the video).
Cheers
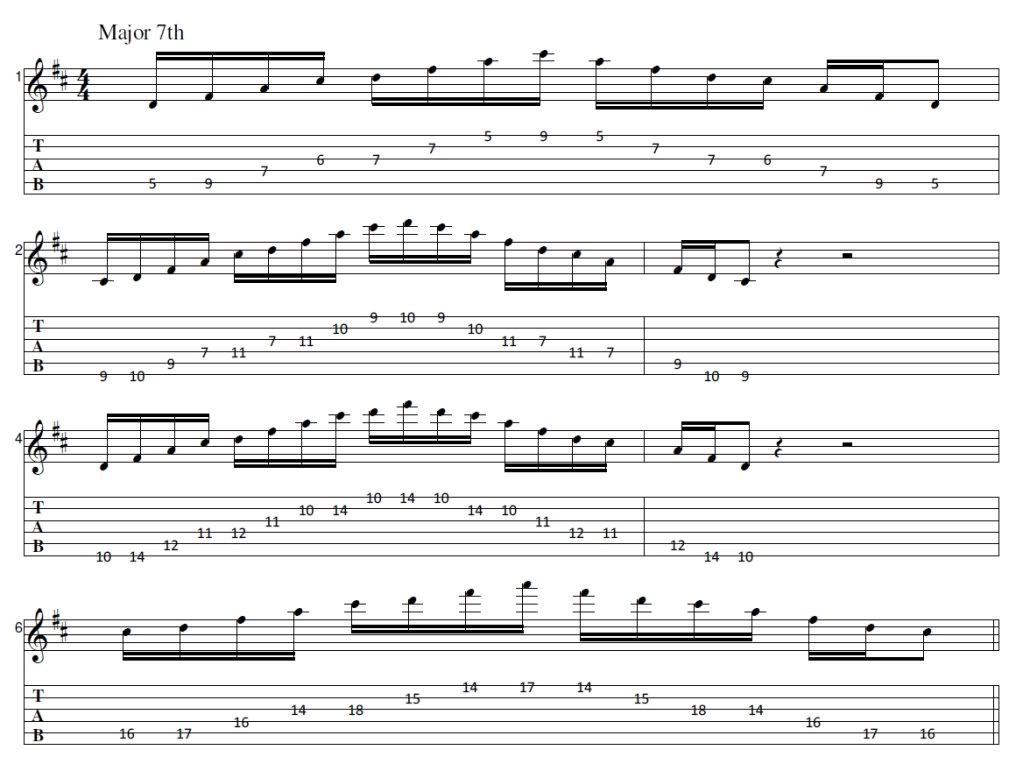
Still on my quest for fretboard visualization, I thought that knowing the most common 7th arpeggio shapes would be usefull. So I made up shapes for major 7th, dominant 7th, minor 7th and minor 7th b5 (half diminished) chords.
First the D major 7th arpeggio shapes:
D major 7th arpeggio shapes (click to enlarge).
Now remember the difference between the major 7th and the dominant 7th is that the latter has a minor 7th. So it is the same shape as the major 7th arpeggios only that you shift the 7th down a half step.
This is what you get:
D dominant 7th arpeggio shapes (click to enlarge).
I won't show anymore shapes here, but they are easy enough to build by yourself. Remember:
Minor 7th arpeggios are like dominant 7th arpeggios only with a minor 3rd. So, find your 3rds and shift them down a half step!
Minor 7th b5 arpeggios are like minor 7th arpeggios only with a flatted 5th. So, find your 5ths and shift them down a half step!
What to do with these shapes?
Use them in your playing (obvious, uh?).
See where they are located within your scale. For example, where are these arpeggios relativ to your good old pentatonic scale?
Today's video lesson takes a look at the voice leading in chord progressions and how you can spice up your chord changes by adding passing tones (chords).
Notice how the voice leading gets much clearer by using chord inversions in order to minimize movement.
Try this with any chord sequence you like, play around, be creative!
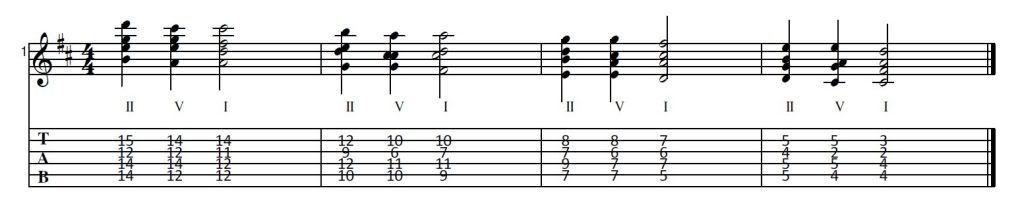
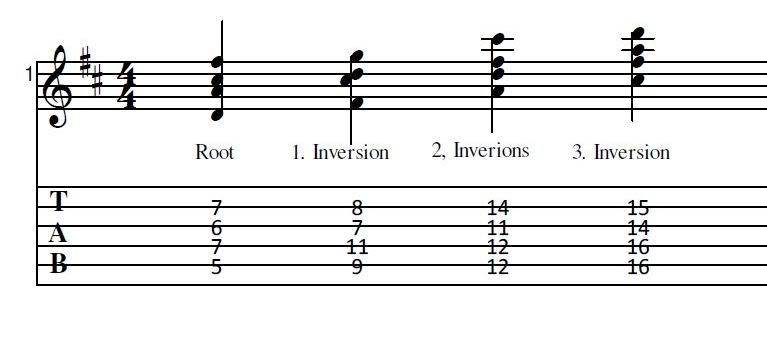
Ok, now we know our 7th chords plus the inversions. Time to use them in actual music!
Take any chord sequence you like, a song of yours, a standard, whatever. Now play that sequence using the 7th chords we learned and their inversions. Again, try to play the next chord using the inversion closest to the one being played.
An example:
I took a standard major II V I progression and played it using the 7th chord inversions. In D major this will look like this:
Major II V I progression using 7th chord inversions on strings 2, 3, 4 and 5 in D major (click to enlarge).
By doing this you will start to see the notes of the chords all over the fretboard. Be aware that the chord tones are the "safest" tones you can play while improvising, meaning they will sound the most "correct" (maybe not the most interesting, but you won't sound wrong). So, if you want to improvise over the given chord progression it will be a good starting point to aim for these notes.
Try this:
After you are comfortable playing your chord progression using the 7th chord inversions, try playing improvised lines using only chord tones.
In the above example you would play just chord tones of the II chord over the II chord, play just tones from the V chord over the V chord, etc...
I added an example of a short line played using only chord tones and very few passing tones (2 or 3). The line uses the exact fingerings you can see above. You will notice that, because I am only playing chord tones, the chords are quite evident even though there's no accompaniment.
Ok, now for something completely different: Stealing phrases from other instruments!
This is a lot of fun and can give you some really fresh ideas. In this example i stole a short phrase from one of my favourite east asian instruments, the erhu. Take a look at the phrase the lady in the video plays at around 0:38 seconds:
Now try to play that phrase!
Don't just play the notes. Pay attention to the little nuances, like the short pull-offs and hammer-ons and study the vibrato. Quite different from how you play your guitar normally, isn't it?
Once you get a feel for the phrasing try to write your own little piece of music with it. It doesn't have to be traditional chinese music. Here I've recorded a little funky backing. First I play the phrase from the video (My version is far from perfect) then I add some improvised pentatonic phrase mixing the erhu feel with a more traditional electric guitar feel:
The cool thing today with youtube and the likes you can just listen to all kinds of fascinating instruments. If you find something you like, try to learn from it. And remember you don't need to learn a whole song. If there's one thing that strongly appeals to you, learn that, copy it analyze, do whatever youcan and want to get something out of it, which will be usefull for your music.
Have fun experimenting!
PS: If you want to listen to a whole instrumental guitar song, where I tried to incorporate some asian sounds, listen to "Tsingtao Blues" of my CD "Space Fish" on my Myspace page: www.myspace.com/svidi
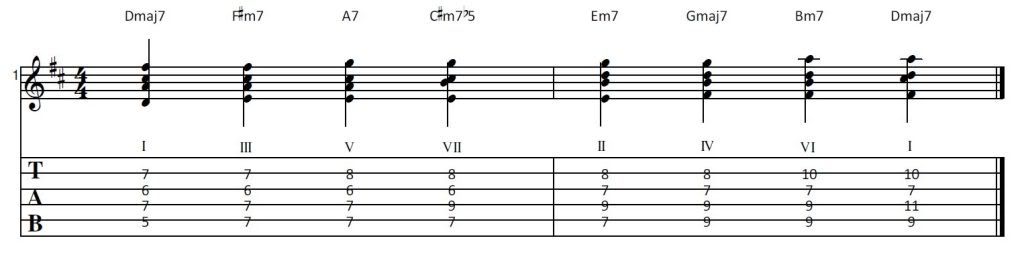
Great, so in the last lesson we learned about 7th chords and their inversions. Now here's an exercise that I like very much to visualize all the inversions diatonic to a specific scale (diatonic = belonging to that scale).
Basically you take a 7th chord and then go up or down in 3rds diatonic to the scale you're in and play the chord on that degree, trying to play the inversion where you'll have to move the fewest notes. If you do this right you'll notice that you'll have to move only one note! Here's an example in the key of D major: (Notice that I use roman numerals to depict scale degrees! root = I, second degree = II, etc...)
Start with Dmaj7 root position.
Go up a third and play the 7th chord on that scale degree, which would be a III-7 (F#-7).
Go up a third again and play the 7th chord on that scale degree, which would be a V-7 (A7).
Up a third again to the VII, which is VII-7b5 (C#-7b5).
Next is the II-7 (E-7).
IVmaj7 (Gmaj7).
VI-7 (B-7).
And we are back to the I but in it's first inversion.
Shifting 7th chords up diatonically in thirds. Only one note per step needs to be moved (click to enlarge).
Notice that we have passed all the seven degrees of D major and have just reached the first inversion of the I! This means we have passed all the possible 7th chord inversions which lay between the Dmaj7 root position and the Dmaj7 first inversion.
What to do next?
Go upwards from the first inversion to the second inversion.
Then from the second to the third inversion and then from the third to the root.
Do the same going down in thirds.
What about shifting by other intervalls?
That is also a great exercise. I just like this one in thirds very much as only one note per step needs to be shifted and because you play every inversion between starting point and end point.
Here I will post all the things related to music that move me at the moment. These will be mostly lessons, licks, ideas and other discoveries.
As I am a guitar player many posts will be related to the guitar, but it will probably not be limited to the instrument of my choice.
I hope you will enjoy it and I am allways happy about feedback.
Cheers
Vidi


